

Touchstone Home Products gifted the insert for this project. As always, all opinions are my own.
I never thought I would have a TV in my bedroom. My parents never did and I never understood the appeal. Now, one of my absolute favorite things to do is curl up in bed and watch a show with Jordan. With the fireplace done, it’s made our nighttime routine even cozier!
If you missed the first part of the fireplace build, you can find that here.

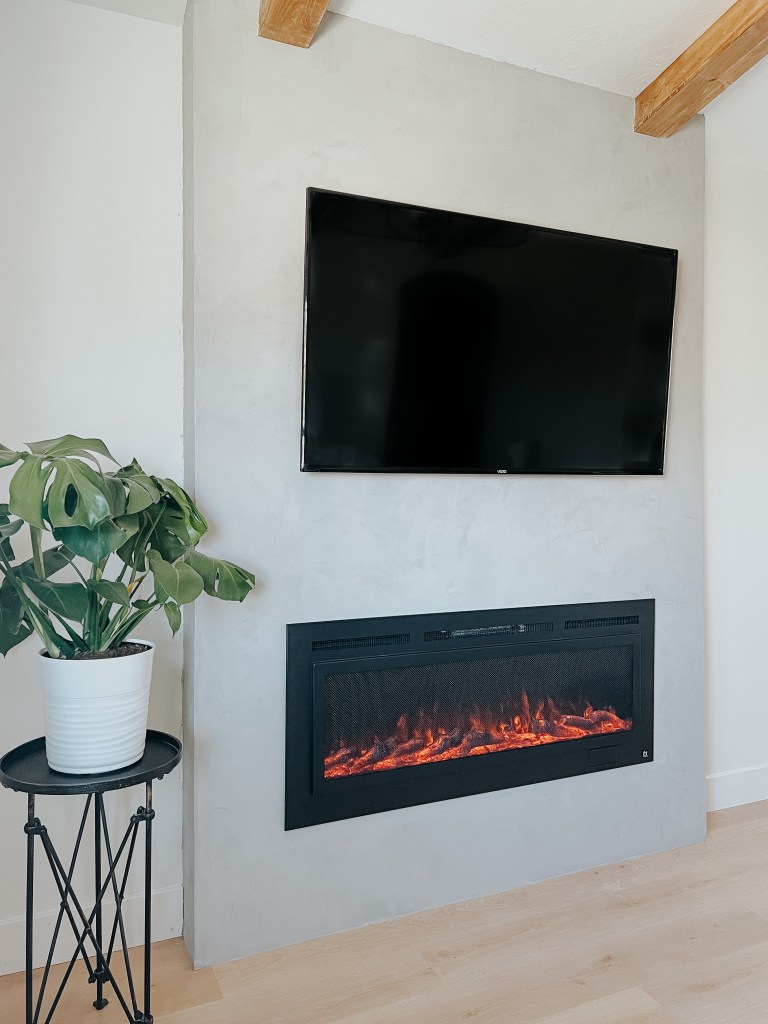
The Touchstone Sideline Steel Mesh Recessed Insert is so perfect in here! I used one of their inserts with a glass front in my living room, but something about this steel mesh front is so perfect. The traditional texture balances the modernness of the faux cement and rounds out the build.


My favorite things about Touchstone inserts is the realness of the flame. Even my Dad (a known electric fireplace skeptic) commented on how nice it looks. I also love that I can choose to have it put out real heat and set it on a timer so I can don’t have to remember to shut it off.
Disclosure: Some of the links provided are affiliate links, which simply means I may earn a small commission (at no additional cost to you) if you shop through one of my links.
Materials
- Roman clay (I used the color skipping stone)
- 6” putty knife
- Sandpaper
- Touchstone Home Products 50” Sideline Steel Mesh Recessed Electric Insert
- Tape
- Caulk
- *Joint compound
Tutorial
I was a little bit nervous for the Roman Clay finish on this fireplace because it’s a finish I’ve never worked with, but I was pleasantly surprised at how easy it was! It felt very beginner friendly and hard to mess up.

You need your drywall to be at a level 5 smoothness. This basically means perfectly smooth. A little bit of texture left behind from a paint roller is fine, but anything more and it will be difficult to get the right look with the Roman clay. It’s also worth mentioning that if you’re working with raw drywall, be sure to prime with drywall primer first!

Dip the edge of a 6” putty knife into the clay to pick up a small amount of material and smear it onto the surface. You want to work in wiggly and wavy motions to add movement into the finish. Spread out any ridges that you create as you go. You can see my video tutorial here.


The first coat will look thin, and that’s ok! Don’t panic. Sand down any ridges or rough spots with a high grit sandpaper (I liked 320) and then do another coat. I ended up doing 3 coats because after 2, there were still a a few spots where I could see the drywall primer peeking through.

Normally I am the queen of not using drop cloths (for good or bad lol) but I would definitely recommend putting one down for this project!
Once you’re happy with the finish, it’s time to put the insert in! This is the second time I’ve used Touchstone Home Products electric fireplace inserts. They are so easy to install, which is a definite plus! After unboxing the insert, I plugged it in and slid it into place. Then I slid the cover on and bam! Beautiful fireplace.

*A couple of notes :
Since I installed the drywall before the flooring, I had a gap I needed to address. I used some flooring putty (which was crazy orange…) to fill the horizontal gap, then joint compound to fill the vertical gap. I sanded it and caulked the edge. Caulk is flexible, so it’ll help prevent cracking. Then I primed and added roman clay over it!
The edge turned out wonderfully, but if you can I would frame, then do the flooring, then do drywall to help minimize any gaps.

Now to build one and let me know how it turns out!
With love,
Mercedes 🖤

2 thoughts on “DIY Bedroom Fireplace part 2”