

Disclosure: Some of the links provided are affiliate links, which simply means I may earn a small commission (at no additional cost to you) if you shop through one of my links.
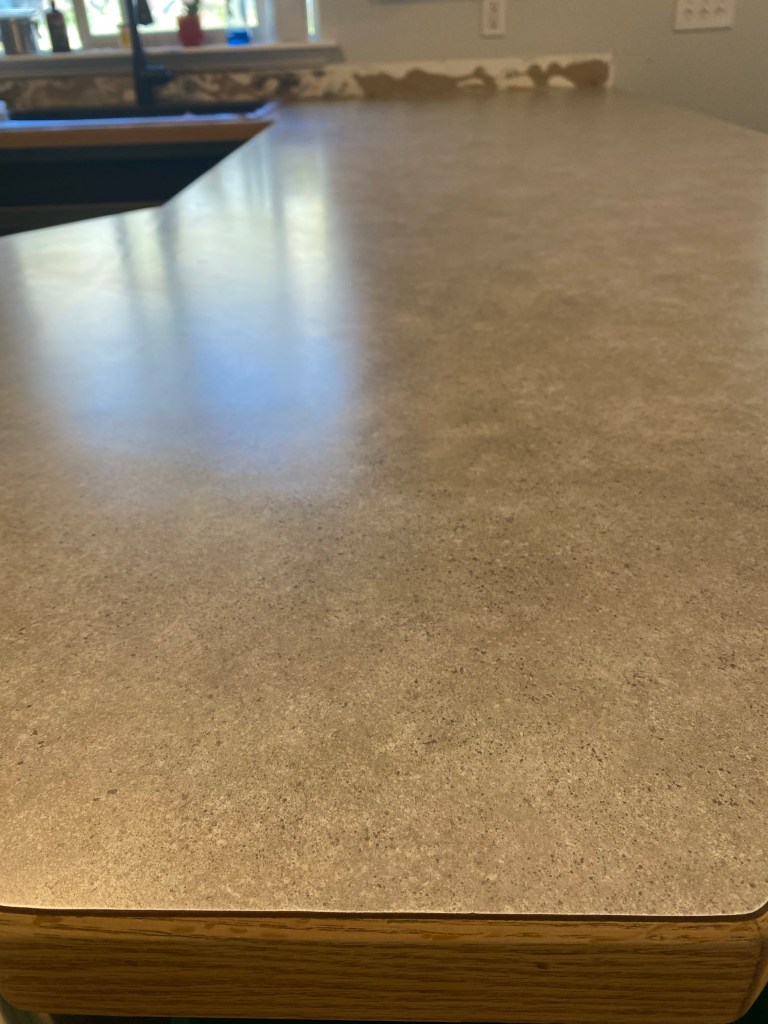
Painted countertops – whaaat? That’s basically the reaction Jordan had when I told him my idea for my parents’ countertops. Their counters were a dated, gray laminate with wood trim that matched the cabinets and they desperately wanted something that would breathe a little life into the kitchen.
Want to see what projects I’m working on now? Follow me on Instagram!
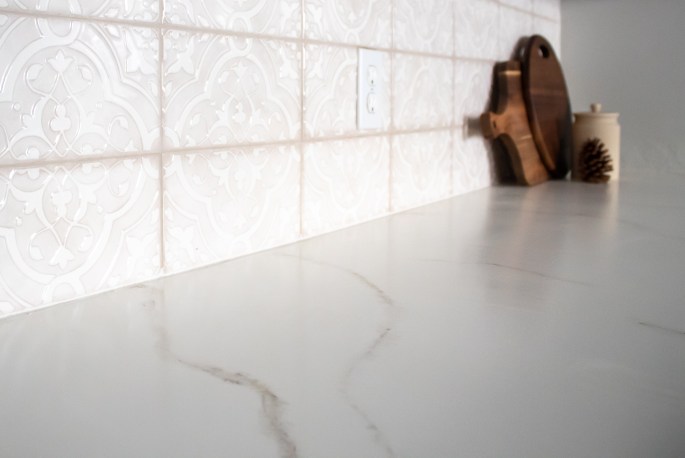
New stone countertops are beautiful but pricey, so we decided to do a budget version by painting them to look like marble. I have seen this done with epoxy countertops, but I decided against epoxy due to reading quite a few negative reviews about epoxy yellowing after just a year or two. So instead of epoxy, we used high performance polyurethane – I’m pretty confident this will hold up because I have seen it used on painted tile floor with no issues. Time will tell, though! I’ll be sure to leave a follow up review once they’ve lived in it for a while.

MATERIALS
- Krud Kutter
- Sander
- 120, 220, and 320 grit sandpaper
- Tack cloths
- Primer
- White Paint (I used latex paint, but you could also use something like Benjamin Moore Advance)
- Floetrol
- Craft paint
- Foam roller
- Brush
- Craft brushes
- Polyurethane (gloss)
- Foam brushes
TUTORIAL
Step 1 is to clean – you need your counters to be cleaner than they ever have been. I like to use Krud Kutter, but any heavy duty cleaner will work. Once they’ve been cleaned, you need to sand them with 120 grit sandpaper. Your goal here is to scuff up the surface so that your primer sticks really well. Once you’ve roughed everything up, wipe them down with a tack cloth and remove every last speck of dust.
With your counters prepped, you can prime them. I’ve written about how much I love Zinsser’s B-I-N primer before so of course that is what I used here! I think it has phenomenal adhesion. Cut in along the edges with a brush, then use a foam roller for the larger sections. You should only need one coat. After it’s dry, sand it with 220 grit sandpaper to get it as smooth as possible.

Now you’re going to add the base color. I used Benjamin Moore Simply White (Regal Select, eggshell finish) because I had it leftover from painting the walls in my house, but any warm white will do. The white in natural stone has a warm undertone to it, so make sure that whatever white you choose to use it doesn’t read too cool. I like to mix floetrol with my paint when I’m trying to get it smooth. It’s a paint conditioner that opens up the dry time a little so that it can level a bit better. I did two coats of paint and sanded with 220 grit paper between coats. If I were to do it again, I would’ve spent a little more time sanding to get it perfectly smooth – next time! After sanding, be sure to clean all the dust off with a tack cloth again.

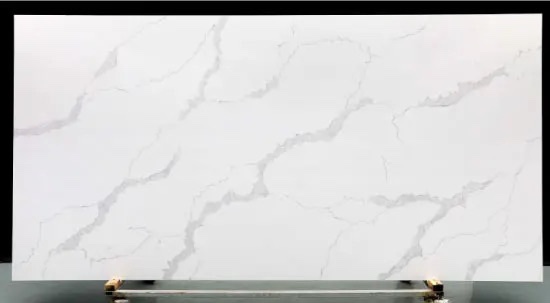
Time for the fun part – the veining! I was so nervous about this step, but it ended up being much easier than I anticipated. I found a few photos of marble and quartz slabs online to give me a general idea of how veins flow through natural stone and I used those for reference while I painted.
First, you’ll brush water onto the section you’re going to paint. You want the paint to be able to disperse, sort of like watercolor. Dip a small craft brush into your acrylic paint and then twirl and drag the brush across the surface. Try not to guide the brush too much since you want organic lines and curves. Before it dries, come back through with a larger paint brush that you’ve dipped in water. You want it more than damp but not quite dripping. Dab your vein and pull the paint out a little bit to blend it.

I used a few different warm gray colors (medium gray, cool concrete, metallic gray, and steel gray), so some veins I would come back through and add in a second color. I feel like the veins that I did 2 lines on are some of the coolest ones! It adds some good dimension.


I highly recommend doing your veining and then coming back the next day with fresh eyes to see if there are places that need more added. I almost doubled the number of veins in one section because after coming back, it looked pretty sparse. On the flip side, if there are any spots you don’t like, you can paint over them with your base coat.

To seal the counters, you’ll need 2-3 coats of polyurethane. To be transparent, I’ve only done 2 coats on these counters so far because I ran out of material, but once I order more I’ll go back and do a third coat. I found that the best way to get the smoothest finish on such a large surface area was to pour some on the counters and then spread it out gently with a large foam brush rather that “painting” it on.

And that’s it! It’s probably not a good 20 year solution (though I’ve seen painted tile hold up for years, so maybe!), but it’s definitely a good stop gap while you save up to fully replace your counters. What do you think – would you try this? If you have any questions, feel free to comment below!
Did you like these? Check out the counters i did in my kids’ bathroom! Don’t forget to follow along on Instagram for more tutorials like this one!
With love,
Mercedes ♥

I’m not sure when you completed this project, but how is it holding up? I’m going to try it on my half bath countertop to start.
LikeLike
Hey Christina! This was done about a year ago – so far it’s holding up just as expected! A few knicks in high wear spots, but nothing major 🙂 I do have a post about doing this to a bathroom counter as well, but with an epoxy layer on top! Be sure to check that out as well ☺️
LikeLike