

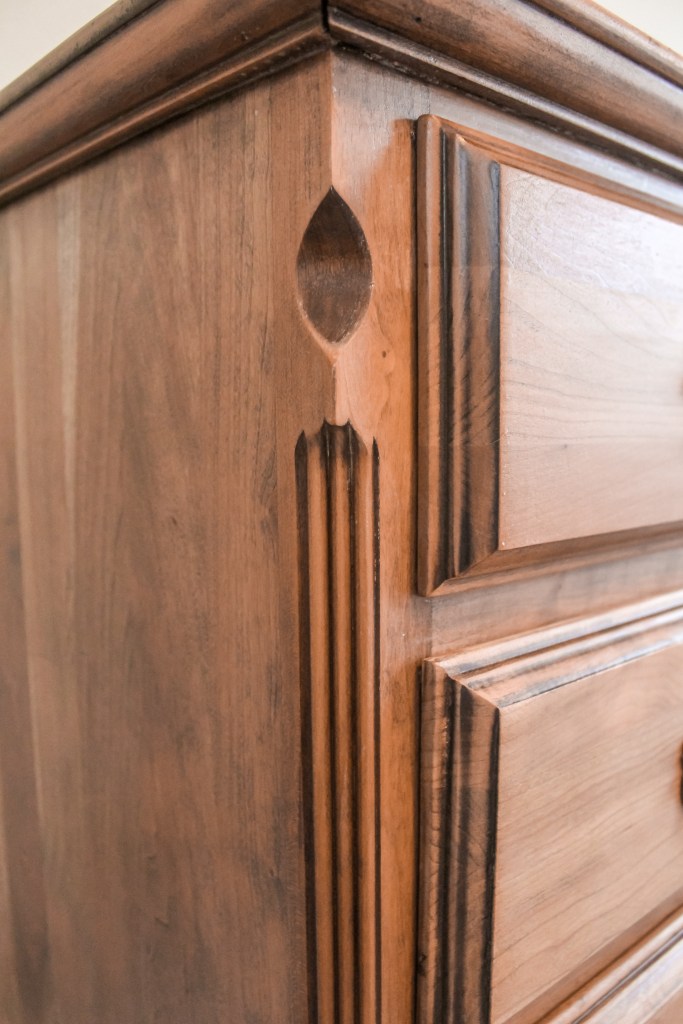
This week has been all about this beauty of a dresser and I have had so much fun, but it has also been so much work. I started with an old, dark, reddish-brown dresser and what I have now is a gorgeous honey colored piece and I am drooling over how it turned out. I do wish that it was a little bit lighter, but I still love the finished product!

J and I have not had a dresser the entire time we have been married. The first house we lived in had plenty of shelving in the closet. Take that and add a couple larger nightstands with drawers and we had no need for a dresser. Now, we have been living in this house for almost two years and even though the closet has no shelving for clothes, we haven’t gotten a dresser – until now! The poor plastic Sterilite drawers in the closet are ready to burst and it’s impossible to keep anything organized in there for more than 2 seconds due to a lack of proper storage.
There is an obvious spot for a dresser in our bedroom (a large empty wall opposite the bed), but I really wanted to avoid putting one there. Why, you might ask? A lot of people (probably most!) have dressers in their bedrooms! Well, in order to get to our closet, you have to walk through our master bathroom. I don’t mind this at all, it just feels weird to have half of my clothes in the bedroom and the other half all the way in the closet. I want to keep the clothes mess out of the bedroom as much as possible by centralizing the clothing location, so I have been holding out until we redo our closet. Sigh.

Since I didn’t want a dresser, that wall stumped me for a long time. I just couldn’t figure out what to put there if it wasn’t a dresser! I considered a bench decorated with pillows and some great artwork above it, but I have been planning to put a bench under one of the windows and having two benches in one room just wasn’t going to happen. Reluctantly, I decided to start imagining what life with a dresser there would look like. Suddenly, I realized that we could use it normally until we got our closet situation fixed, but then we could use it for seasonal clothing storage! It seemed to be a good middle ground for the part of my brain that wanted a dresser and the part of my brain that didn’t.

I got an idea of what I wanted (which was classic looking with light wood) and everything I could find was out of my budget. Remember that part of me didn’t want a dresser, so I couldn’t justify spending a ton of money on one. I began to search on Facebook Marketplace for something that I could refinish (I’ve been planning to refinish our dining room table for quite some time, so I had already done the research and new what I was committing myself to). When I read that the only reason this particular piece was for sale was that it was so heavy the seller didn’t want to move it, I knew I had found the one! It’s a solid item that I could turn into exactly what I was looking for.


HOW TO REFINISH A DRESSER
I started by using CitriStrip to pull a ton of the existing varnish and stain off/out of the wood. I could’ve just sanded for 83 years, but besides taking more time, the straight sanding method can also lead to loosing the profile (details like curves and ridges) of the wood.
Using the CitriStrip is really simple. Here’s what you’ll need :
- Chemical resistant gloves
- CitriStrip – I used 2.5 jugs for this project
- Chippy brush
- Heavy plastic drop cloth
- Lots of plastic grocery bags
- Odorless mineral spirits
- Steel wool
- Paper Towels
- Plastic or metal scraper – I used a plastic putty knife
Lay out your drop cloth because this will be messy. Start by pouring a bunch of CitriStrip onto your furniture and then spread it around with the brush. You want a good, thick layer of gel (1/8″-1/4″ thick), so don’t brush it too thin. Don’t overbrush it either. The gel will work for you, you just need to lay it on. The CitriStrip works while it is wet and the thick layer helps prevent it from drying out. To help it even more, lay grocery bags on top of it. I did a little experiment and this does make a difference!
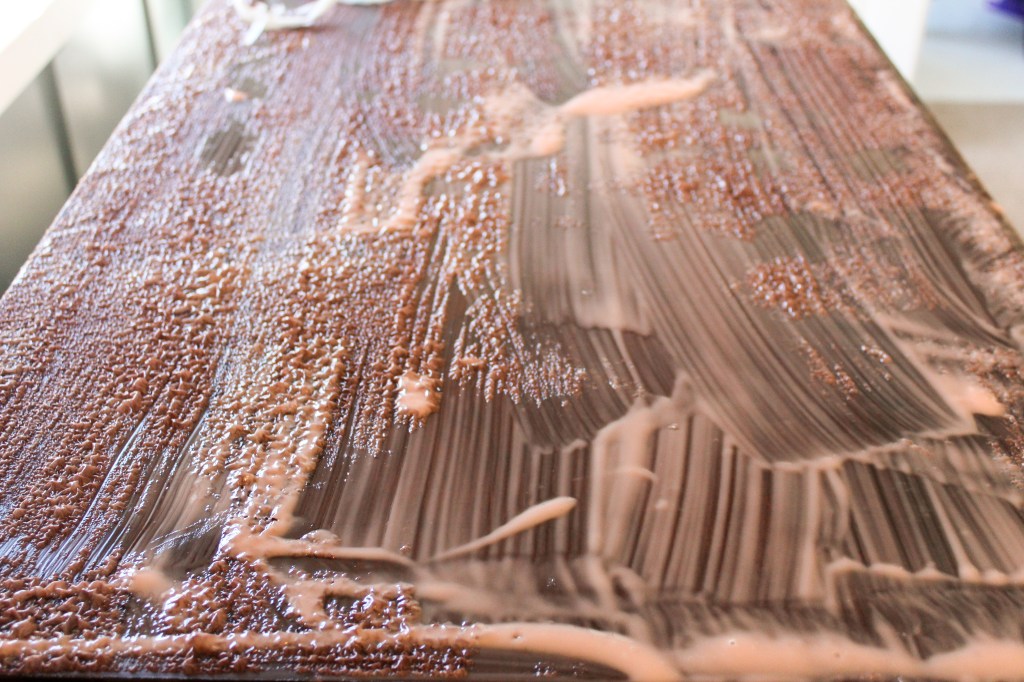
It will start to look really cool when it pulls the gunk out of your wood. Don’t worry, it’s not drying out. The top layer can look a little dry, but the layers underneath will still be wet. I left mine for about an hour and a half. The instructions say that you can leave it for up to 24 hours, but I wouldn’t leave it for much longer than I did. There were some spots that had dried out and were a little difficult to get off with just the hour and a half wait time.

Now grab your scraper and scrap off all the goo! It is super satisfying. I used a grocery bag to dump all the gunk into. You’re going to need to clean all the residue off with mineral spirits. Buy the stuff that says “odorless” because even the odorless stuff is really stinky. I used a combination of paper towels and steel wool (both with mineral spirits on them) to get the residue off. The steel wool is great for places where the CitriStrip has stuck and I think I used a whole roll of paper towel during this part.
My mineral spirits made everything stinky, so I wiped the dresser down with rubbing alcohol at the end, which helped a lot. When I did the drawers, I sanded right afterwards and that got rid of the smell.

At this point, there will be some stain left in the wood. I’m sure you could do another round of CitriStrip and have even less sanding to do, but I opted to just sand out the little bit that was left. I started with 60 grit, then 100 grit, 150 grit, and finally 220 grit and used a combination of a palm sander and detail sander. The 60 grit does a great job removing and then the other ones help you to work to a perfectly smooth surface.
Between the scraping, the wiping, and the sanding, this project was really hard on my arm (I’ve had four pretty intensive elbow surgeries). I ended each day with a pretty swollen elbow, so one of the things I was dreading was needing to manually sand all of the little crevaces. I ended up really loving the character that the darker cracks gave it, so I just left them! Leaving the dark accents wasn’t something that I planned on doing originally, but it makes the piece so much better than I imagined.

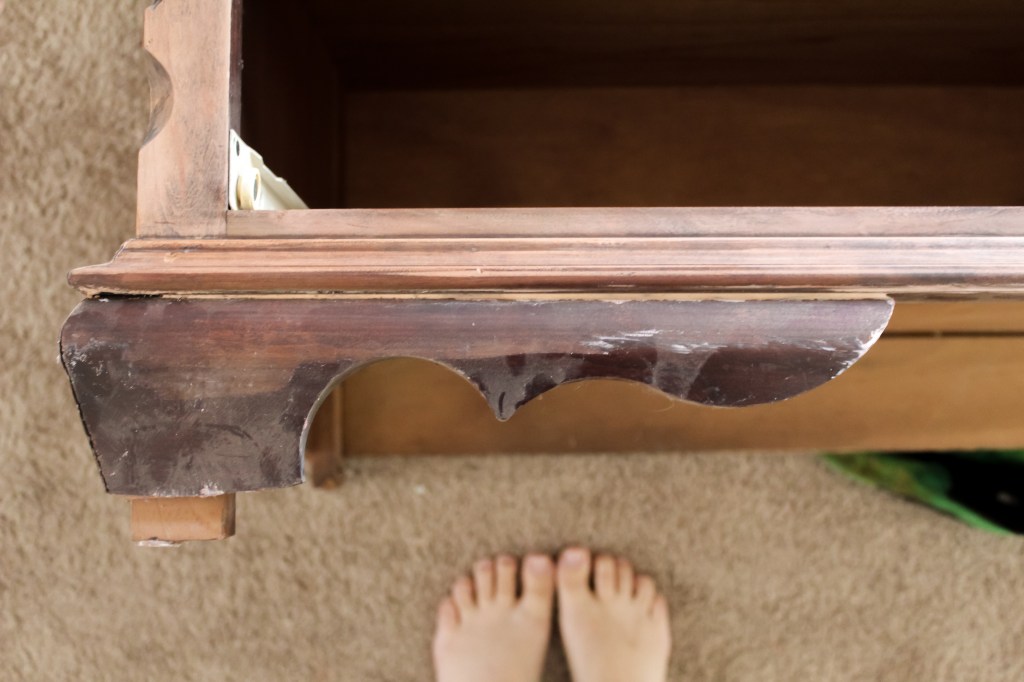
The only thing that I didn’t love about this dresser (besides the color) was the skirt around the bottom. It gave the piece a dated look and was not the look I was going for. I bought some new furniture feet to add, but when I removed the skirt I fell in love with the super simple feet that were hiding behind there! Again, not something I was planning on doing originally, but exactly what this dresser needed. I was worried about the arches being uneven and also considered attaching a little arch to the front, but you can’t see them anyway (the molding keeps the arches hidden) when the dresser is standing upright.

I added two layers of polycrylic, which made the wood a little darker than I wanted. Anytime you add poly to unfinished wood, it will make it a little darker. I tried to counteract this effect by adding Britax Liming Wax on top, but I didn’t love the finish. It lightened it, but it took away a lot of the yellow tones and left the red, which just made it look pink. I sanded all the wax off and redid that section with polycrylic.

Refinishing this dresser was so much fun! I’ve heard that when sculptors work, they feel like they’re releasing their sculpture from the block of marble and that’s kind of what this project felt like to me. It felt like I was breathing new life into this piece and like I was uncovering her story. I get why doing projects like this can be addicting!

In other One Room Challenge news, I ordered this chair and this lamp! I was planning to recover an old chair, but I was able to purchase this one and stay within my budget. Yay! We also got the bed moved back to where it should be, so it’s on the board and batten wall now and the way the headboard plays with the accent color is so dreamy. This week I’m going to be making a bench to go under the window and maybe even getting the rest of the room painted, so be sure to follow me on Instagram (@with.love.mercedes) to follow along and see the process. Don’t forget to check out the ORC blog page and see what all the other participants are up to. Everyone’s spaces are all coming together so nicely!
With love,
Mercedes ♥


One thought on “Dressers and Compromises : One Room Challenge Week 4”