

Disclosure: Some of the links provided are affiliate links, which simply means I may earn a small commission (at no additional cost to you) if you shop through one of my links.
Almost 2 years ago, I completely redid the fireplace in our house. One of the best decisions I made with that fireplace was adding thin brick and then using a fun technique called German schmear (thank you Joanna Gaines!!!) to give it new life.

So when my friend asked me if I could help her with her fireplace, I was excited to use this technique again. She and her husband recently purchased their first home and she wanted to update the fireplace. It is a really big fireplace that makes a large statement in her living room. I don’t hate a good stone fireplace, but the stone did feel a little heavy for the space and the previous owners painted just the middle section gray, so it felt a little unfinished.

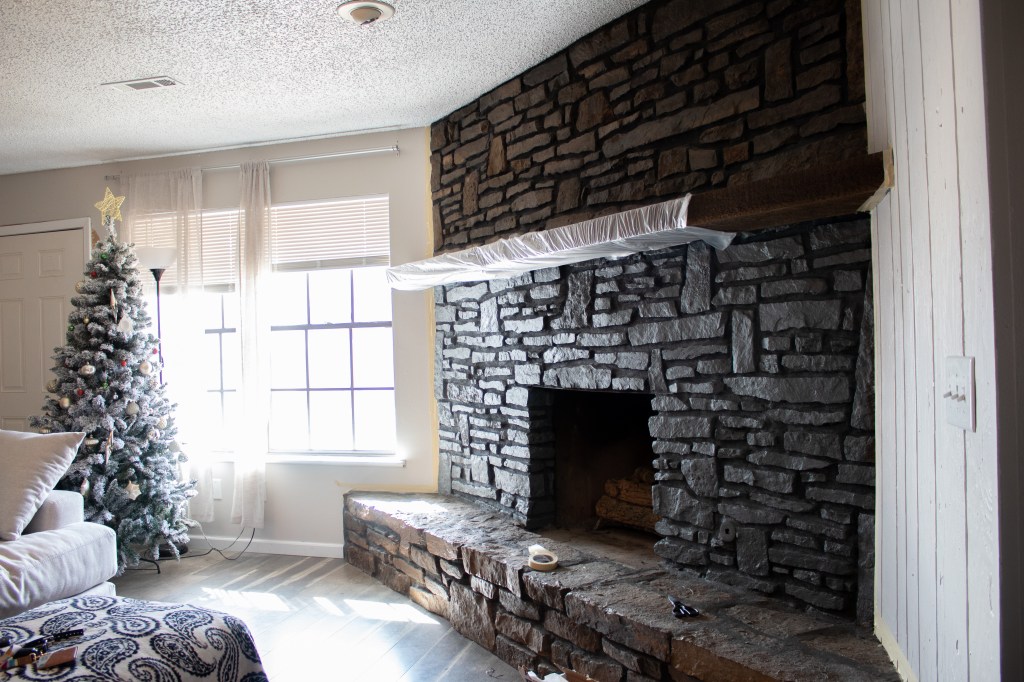
The way that brick (which is what this technique is most commonly used on) grabs the mortar is a little different that the way stone does, so if you’re planning to do this technique on stone then you need to look at a lot of pictures of stone specific German schmear before taking the plunge. It will look a little different than the same technique used on brick.
This is such a great project – you can totally do it by yourself even if you have very little experience! Though it will go twice as fast if you can convince a friend to help you out. Like I said earlier, her fireplace is really large and even with that, it took us less than 2 hours to finish it.
TUTORIAL
Grab all of these goodies (it should run you less than $50)
- Painters tape
- Two 5 gallon buckets (one for mortar, one for water)
- White mortar
- Mixing paddle
- Tile sponge
- Gloves
Normally I’m kind of anti-painter’s tape… I usually prefer being careful and cleaning up any small mistakes, but this is a really messy project and you will need to tape off your wall and floor in order to get the right look. So the first step is to tape!
After you’ve got everything taped off, mix your mortar. Fill about 1/4 of your bucket up with dry mortar (this will be really dusty, so hold your breath or wear a mask) and add…some water. Start with about 2 cups of water and then go from there. To use the mixing paddle, just attach it to the drill and use it like a kitchen hand mixer, making sure to mix the mortar for at least 2-3 minutes. The consistency you want is similar to peanut butter. If you lift your mixing paddle and the mortar is dripping off, it’s too runny (just add a little more dry mortar and you’ll be fine) If it’s really hard to mix or still has dry clumps, add a little more water. A little bit of water goes a long way here.

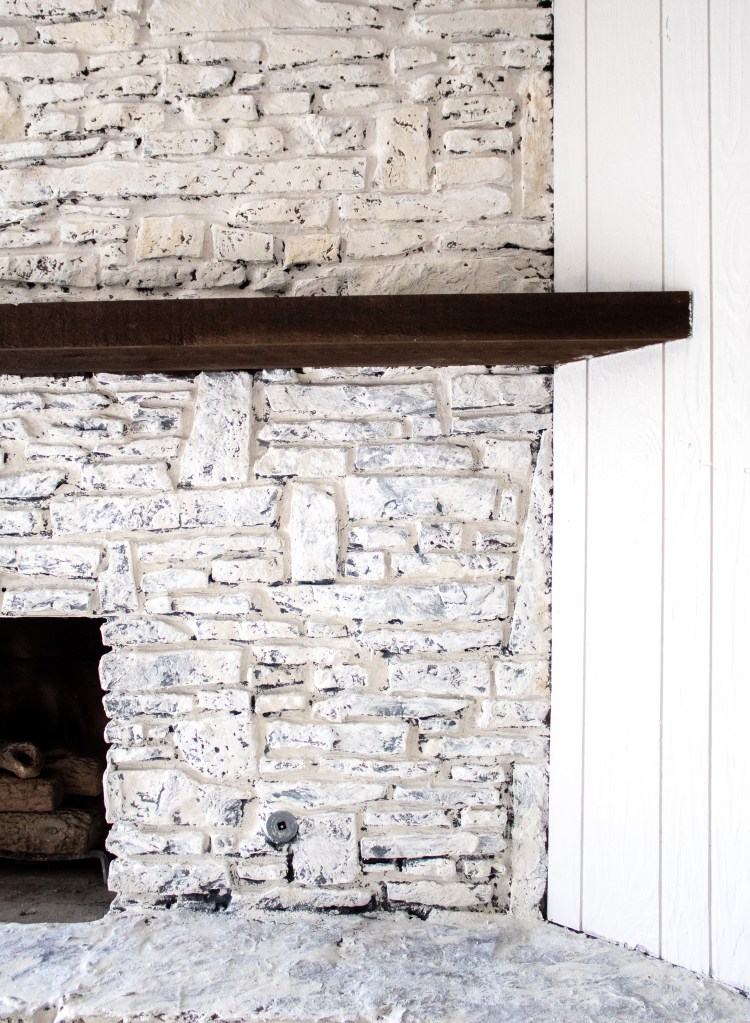
Now comes the fun part. Put on some gloves and smear the mortar in the grout lines of your stone. You can use a gallon sized bag with the corner cut off to pipe the mortar into the lines, but since this fireplace is huge, I knew we’d waste a lot of time refilling the bag a million times if we did it that way. We just smeared it by hand!

After the grout lines are filled, spread the grout onto the face of the stone. Dip the sponge into the water and wring it out all the way so that it is holding hardly any water. Start with the soft side and wipe the mortar so that it lightly spreads onto the front of stone. Use the rougher side to wipe off spots if you accidentally spread too much mortar into one area. Rinse the sponge frequently to keep your technique uniform across the whole area.

It is easiest if one person fills the grout lines and the other person follows with the sponge, but you can easily do this yourself. If you are working alone, be sure to work in small sections so that the mortar doesn’t begin to set before you start smearing it.
A couple of tips :
- Take frequent breaks to step back and look at the fireplace as a whole. It is really easy to adjust before the mortar sets, but difficult to afterward. Look for any spots where you might need to add more mortar on or wipe more away.
- Make sure that you are wiping the mortar all the way to the edges (hence the need for painters tape) or it will look like it tapers off at the edges.
- Use a lot of lotion after this project. I always end up seeing touch up spots after I’ve taken my gloves off and mortar really dries out your hands.
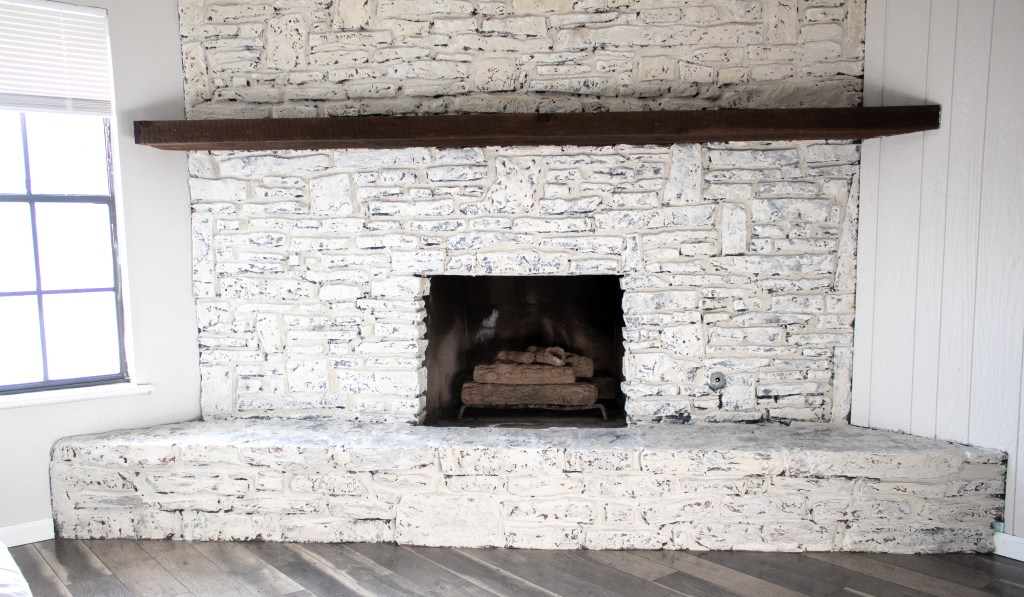
And that’s it! This technique yields such a pretty, old world-y feel but is really fast and easy to accomplish. If you end up tackling a project like this, tag me on Instagram (@with.love.mercedes) so I can see it.


With love,
Mercedes ♥

Love how this turned out!
We just bought a home that has the exact flooring you have! Any chance you know where its from?
LikeLike
It’s Maganda Hand Scraped Bamboo from Floor and Decor!
LikeLike