

Disclosure: Some of the links provided are affiliate links, which simply means I may earn a small commission (at no additional cost to you) if you shop through one of my links.
It’s done, it’s done, it’s done! This project really should have only taken two, maybe three days but our household got hit with RSV hard so it took about a week. E had RSV, pneumonia, and a double ear infection (poor kid). He so lovingly shared all his germs with me and I’m going on week three of fighting this thing. Anyway, we are on the upswing and I finally have enough energy to get a few things done!
Want to see what projects I’m working on now? Follow me on Instagram!
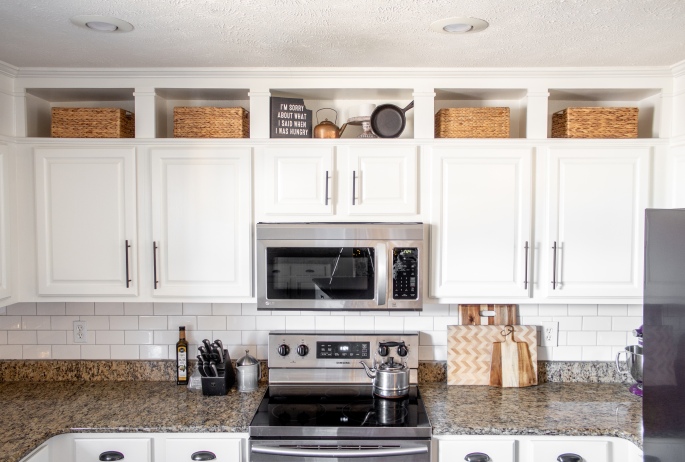
Over a year ago, I built our kitchen cabinets up to the ceiling and added these cute cubbies to one wall. While I love the side ones that I’ve put baskets in, the middle one has had me stumped. I can’t seem to style it in a way that I like without it feeling cluttered to me. I had the idea of building a faux vent hood over the microwave and so off to Pinterest I went! I found this from Holly over at Our Faux Farmhouse and while I didn’t want that exact style, it confirmed to me that I could make it and it wouldn’t look weird.
Our kitchen has a ton of cabinets (like, we have 30 cabinets – not even including all the drawers) so I wasn’t worried about losing the awkward cabinet over the microwave that I can’t reach anyway. The outlet for our microwave is in that cabinet, so my original plan was to cut out the bottom of the cabinet so that you could still access that. That plan had to be modified because our microwave screws into the base of that cabinet, so we wouldn’t be able to remove the microwave to access the plug without getting to those screws first.
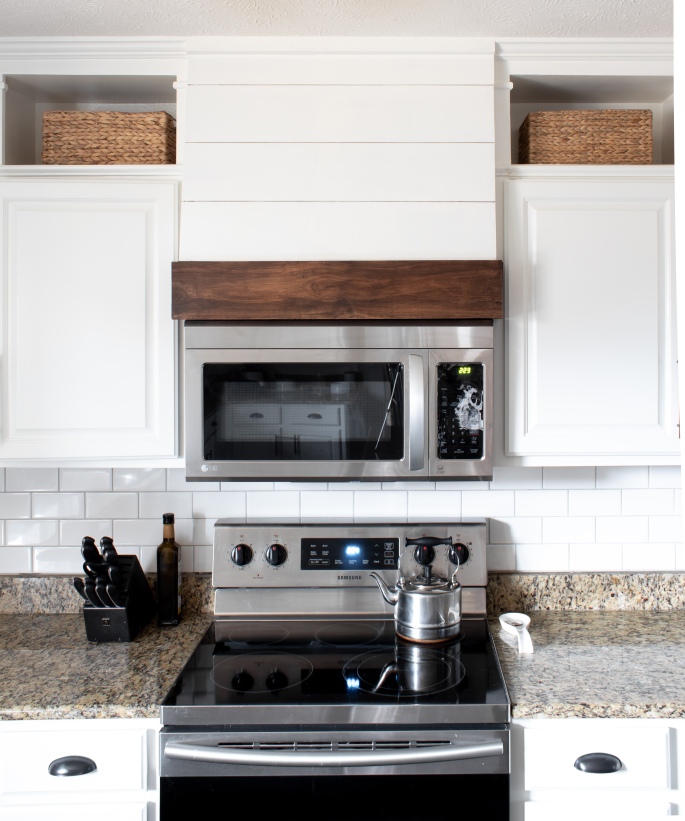
The solution was to add hinges to the front wooden piece and it worked really well! I was worried about it not hanging fully closed, but it’s not an issue!

It turned out so well and it ties in with our island perfectly. This super easy, super cheap addition makes me love my kitchen even more than I did before, which I didn’t know was possible!
tutorial
Materials :
- (2) 2×4 sheets of OSB
- (1) 4×4 1/8″ plywood
- (1) 1x6x6 select pine
- (1) 1x2x8 select pine
- 2 inch brad nails
- 2 inch screws
- (2) 2.5 inch hinges
- Construction adhesive
- Nail gun
- Drill
- Circular saw
- Miter saw
- Level
- Wood clamps
- Rustoleum Gel Stain
- Benjamin Moore Advance Paint
- Primer
First, remove your cabinet doors and any crown molding. Next, cut your 1×2 to make two 30″ pieces and a third, longer piece. You’re going to use this as a support for the sides of your vent hood (if your cabinets don’t go to the ceiling, then cut supports to fit the distance between the microwave and the top of the cabinet and adjust accordingly). To attach them, measure the thickness of your OSB (it should be around 5/16″ ) and set the 1×2 in from the microwave that same distance. Drill pilot holes, make sure it’s level, and use a wood clamp to hold it to the cabinet while you attach it with 2 inch screws.

Now you need to cut your OSB. Measure the distance from the top of your microwave to the ceiling (minus 1″) and the distance that your microwave sticks out (minus 3/4″). You’re going to cut out a long triangle with a rectangle on the bottom. Mark the height of your hood first, then measure 5 1/2″ up from the bottom of that and make another mark. Mark the depth measurement at the 5 1/2″ spot as well as at the bottom of your height measurement. Draw a line between the corner of the OSB and that mark (5 1/2″ up, x” deep) to create your triangle. Draw a straight line between the two depth marks and from the bottom depth mark to the edge of the OSB to create your rectangle. Now, cut along these lines using the circular saw. This doesn’t need to be perfect because it will be covered with shiplap, but try to keep it as straight as possible (this cut is outlined in blue below). Repeat this process for the second side.

On each piece, cut out a small notch (indicated by the orange box in the drawing above) that is 1″ tall and 2″ deep.
Using a wood clamp and 2 inch screws, attach your sides to the supports.

Measure the length of the hypotenuse of the triangle you just cut and the distance from outside edge to outside edge of your side pieces. Cut a piece of OSB that matches these dimensions. Lay it on top of your side pieces (making sure the bottom is level) and attach it to the side pieces with the nail gun.
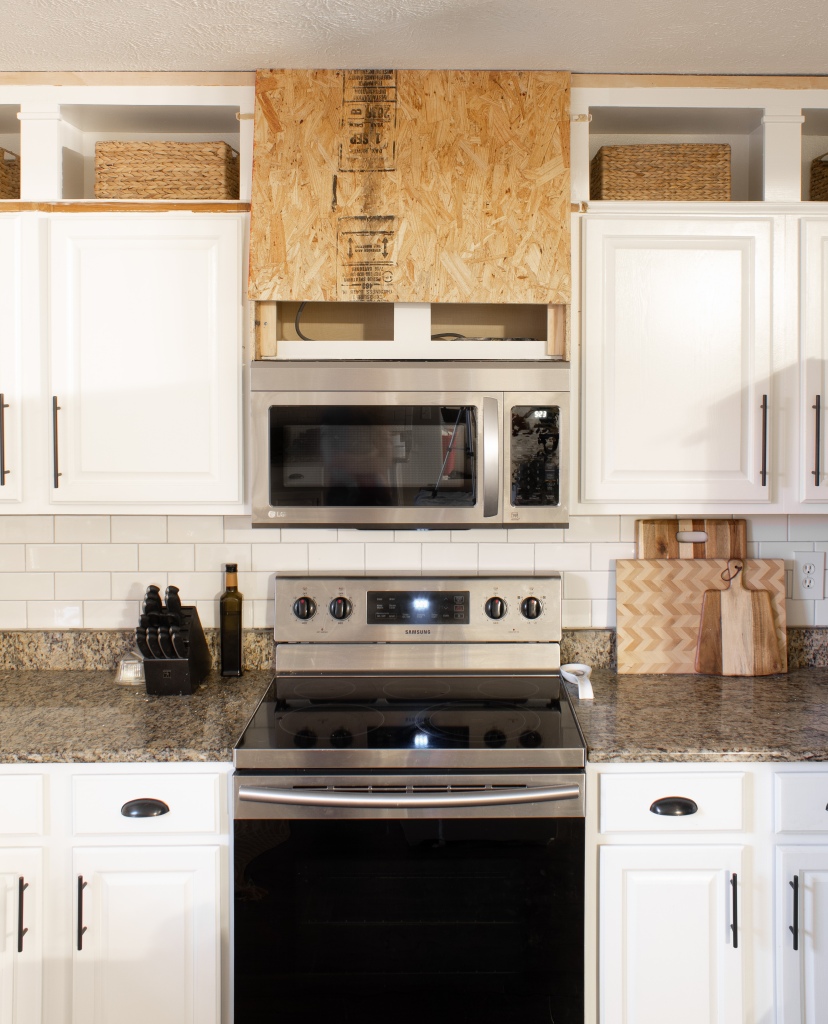
Yay! The frame is done. Prime your OSB so that you don’t have to fight with a paint brush to paint between the shiplap gaps.

Now attach the shiplap. I used spare pieces of shiplap from a previous project where I had taken a 1/8″ thick piece of plywood and ripped it down to 5.75″ wide strips. Starting with the sides, trace the angle you need (mine ended up being 9 degrees) and use a saw to cut the pieces to fit. Use an 1/8″ spacer to leave that classic gap between your shiplap.


To attach the shiplap, I spread construction adhesive on the back and then used my brad nailer to attach it to the frame. Since this is above the stove and will be exposed to a good amount of steam overtime, the glue is important to keep it from warping and popping off. Start from the bottom (about 1/8″ above where the top of your wooden base will sit) and work your way up.


Now it’s time for the wooden base. Measure the distance from the outside of the OSB on the left to the outside of the OSB on the right. This will be the measurement for the inside edge of your front piece. Set your saw to cut at a 45 degree angle and cut your 1×6. Now cut a piece of 1×2 to this same width, but this time don’t miter the corners. Screw the 1×2 onto your 1×6 from the inside. This will cover any gap at the base left by the hinges.

Drill pilot holes and screw your hinges onto the inside of the 1×6 (not on the edge you attached the 1×2, the other edge). You’re probably going to need and extra set of hands for this one, so recruit your husband! One person needs to hold the 1×6 while the other screws the hinges into the OSB frame. Make sure that the inside of your mitered corners are perfectly lined up with the frame or you’ll have issues getting the side pieces lined up.

Once that is hung, measure the distance from the cabinet to the outside of the 1×6. this is the outside length of your side piece. Make sure to measure each side independently in case they are slightly different. Cut your pieces with a mitered corner to line up with the front piece. The other side should be flat to butt up against the cabinet. Test your fit before attaching them and once you are satisfied, glue one side on and clamp it overnight. Repeat with the other side.

Onto the finishing touches! Fill any holes with wood filler, caulk the edges of the shiplap (but leave the edges of the wood uncaulked), and reattach any molding you took down. Prime and paint the shiplap then stain and seal the wood and you’re finished!

I used Rustoleum Gel Stain since it was a vertical surface and I’m converted – it was so easy to work with!

I also added a piece of 1×2 to the top so that it blended in with the crown molding a little better.

Now try not to stare at your new faux hood vent all day because it will be that good!

With love,
Mercedes ♥

Hi there!
I love the look of this faux hood you created over your microwave. I’m assuming that you have a recirculating venting system on the microwave (with no external ducting) based on the pictures on your blog. If so, does your microwave exhaust out from the top front part? It looks like the hood goes past this part too. Wondering if you had any issues with moisture building up inside the faux hood.
Thanks for all the help!
LikeLike
Hi! You’re right, no external ducting. And no issues so far! If I put my hand over the edge of the front piece when the vent is on, I can still feel air circulating, so I think the air flow works 🙂
LikeLike
are you able to access the plugs ? just worried if microwave breaks or has to be changed out, do you have to tear it down?
LikeLike
Yes I can! The front piece is on a hinge so I can lift it up and access everything inside ☺️
LikeLike
Any ideas on how I could make the entire front into a hinged piece? We have an external duct system and I’m thinking I want to preserve access to that just in case.
LikeLike
You could try to install hidden hinges on the top and leave the sides free, but you would want to make sure you found sturdy hinges to support the weight!
LikeLike
I may have missed this in a previous post – what are your paint/backsplash colors? I’m prepping my cabinets for painting now and cannot settle on a color – leaning toward Simply White or White dove, but I have super bright white trim/doors and hope to change the wall color to a neutral beige to contrast with the white trim but now sure how to tie that in with cabinets. Can there be 3 shades of white/off-white if they are in the same family of colors? And wouldn’t the white in the backsplash have to match the cabinets and/or the wall/trim? Thanks!
LikeLike
Hi Vikki! I do have 3 other kitchen posts covering all of this if you’re looking for links or anything 🙂 the color is White Dove. If you already have bright white trim, though, I would lean towards picking Simply White! I worry WD would come across as too creamy in comparison to the trim work. The backsplash does need to coordinate though, so I would get one piece of a few different tiles you’re considering and compare them to the paint color you chose so they don’t end up clashing!
LikeLike
Great post. I was checking constantly this blog and I’m impressed! Extremely useful info particularly the last part 🙂 I care for such information much. I was seeking this particular information for a very long time. Thank you and best of luck.
LikeLike
Very nice! What is the distance between under the vent and top of the stove? Thks
LikeLike
Thank you! We’ve actually moved homes since this project so I can’t measure for you and it was already installed when we purchased the house! So it’s probably the standard 18”, but that’s just a wild guess.
LikeLike
I seen that you have since moved in a previous comment but wondered if you had a picture of how the hinges were installed? Did you hang it from the back side of the shiplap? Or on the skinny narrow price? And Is there a gap from the bottom ship lap and the stained board? Or did the stained board sit on top of the shiplap?
LikeLike
Hi! I don’t have a photo other than what’s in the tutorial, but the hinge os screwed into the 1×6 board and then into the OSB frame. If I remember correctly, there is no gap as the 1×6 sits flush with the OSB and then the shiplap sits on top of the OSB and buts up against the 1×6. The 1×6 doesn’t sit on top of the shiplap. If you want, you can check out the highlight on my Instagram titled “faux vent hood” as well 🙂
LikeLike
Wow, what an incredible journey completing this project! Despite unexpected setbacks, like battling illness, your determination shines through. Your creativity in repurposing cabinet space for a faux vent hood is inspiring. The detailed tutorial and resourceful solutions, like adding hinges for accessibility, make this project accessible to DIY enthusiasts of all levels. The final result is not just functional but a beautiful addition to your kitchen, reflecting your ingenuity and passion for crafting a space that feels uniquely yours. Cheers to conquering challenges and transforming visions into reality!
LikeLike
Thank you!
LikeLike